


What you’ll need:
If your windows have handles or vents, measure in millimetres how far they stick out from the window frame. You’ll need to include this measurement when determining the ‘depth’ of your blind in the next step.
Combine these two measurements and record the total as Dimension ‘A’. If there are no handles or other obstructions on the window, simply use the blind ‘depth’ as Dimension ‘A’.
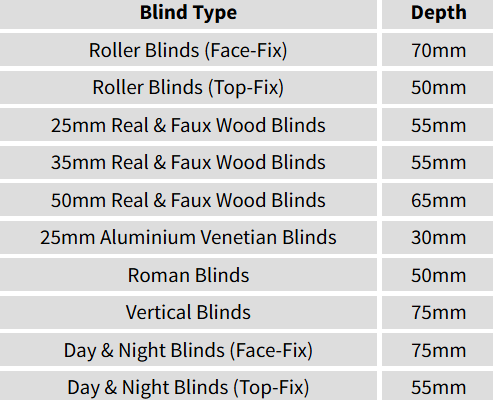
The ‘depth’ of your selected blind type is listed in the table below. This depth represents how far your blind will extend from its fitting point. You’ll need this measurement to ensure you account for the correct space when measuring.
Take the two pieces of paper and place them side by side. Using a ruler, measure Dimension ‘A’ from the back edge and make a mark at the same point on both pieces of paper.
Place the two pieces of paper on the windowsill, one on each side of the bay window corner, with the edges against the window frame. Slowly slide the papers towards each other until the two marks align.
Using the pencil, mark the windowsill at the precise point where the paper touches the window frame. Repeat steps 2 and 3 for each corner of your bay window.
Carefully measure the distance between each set of marks and record the measurements. These are the ‘exact’ widths for the blinds you’ll need to order.
To measure the drop of your blinds, simply measure from the top of where you want the blinds to hang down to the desired endpoint (usually the windowsill, if applicable). Take this measurement at least three times across the bay window and use the smallest of these measurements.
For Vertical Blinds only, subtract 12mm from this measurement to ensure the fabric louvres don’t touch or drag on the windowsill.
Remember, all blinds for your bay window should be ordered as ‘Exact Size’.
Meerkat Blinds provides high-quality custom blinds, precise measuring, and expert installation to enhance any space with style and function.
©2024. Meerkat Blinds. All Rights Reserved.